Lab Network Configuration
- By Aaron
- Sat 14 December 2019
- Updated on Sat 14 December 2019
Network Topology
Below is a diagram of my home network. I have AT&T fiber service right to the house. The guys that lived here before me had the line put in. Super rad.
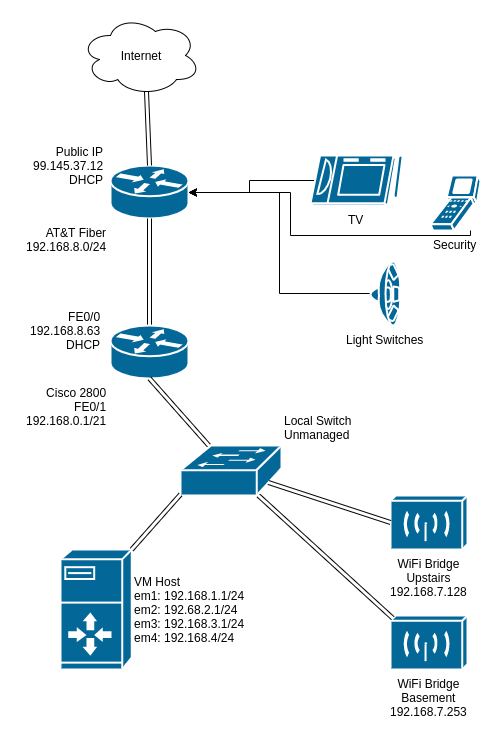 Diagram created with DrawIO
Objectives
The VM host has 4 NICs, each will handle 192.168.x.0/24. The em2 interface 192.168.2.1/24 will handle all of the VM traffic while em1 will handle the host traffic. The em2 interface will have no access to traffic on em1. The remaining two interfaces are reserved for future use. The virtual networking for the VM host is not in the scope of this article. Mostly because I havent't figured it out yet ^__^
Device Configurations
Following is what needed to be done in order for all this to work. It's all really simple, but for networking know-nothing like myself, it took a while to figure out.
AT&T Gateway
The WAN interface on the gateway is obviously a DHCP interface. The device has a wireless interface to which a handful of devices are connected to.
The LAN interface of the router has been configured to handled the 192.168.8.0/24 subnet. The DHCP service on the router hands out addresses between 192.168.8.64 and 192.168.8.253.
The LAN interface itself has an address of 192.168.8.254.
Cisco 2800
This was the fun one. It took a while to get it working. I was trying everything with static routes, even investigating RIP and OSPF protocols because the AT&T gateway wouldn't allow me to create static routes. Turns out I didn't need any routes or routing protocols. My network wizard friend from work said all I needed was overloaded NAT.
Let's have a look at this config.
First thing to do was to set up the only two interfaces on the 2800, FE0/0 and FE0/1. Note that these are already configured as nat inside and nat outside.
interface FastEthernet0/0
 ip address dhcp
 ip nat outside
 ip virtual-reassembly
 duplex auto
 speed auto
!
interface FastEthernet0/1
 ip address 192.168.0.1 255.255.248.0
 ip nat inside
 ip virtual-reassembly
 duplex auto
 speed auto
!
no ip forward-protocol nd
Next, I want the Cisco to provide DHCP services for the entire /21 subnet.
ip dhcp database disk0 timeout 80
no ip dhcp use vrf connected
no ip dhcp conflict logging
ip dhcp excluded-address 192.168.0.254 192.168.7.255
!
ip dhcp pool all-ur-dhcp
   network 192.168.0.0 255.255.248.0
   domain-name onnix.local
   dns-server 192.168.1.1 8.8.8.8 8.8.4.4
   default-router 192.168.0.1
This was the easy stuff, but when I tried to get any of my devices out to the internet, none of the requests were coming back. The frustrating thing was that I could ping 8.8.8.8 from the Cisco itself, but not from any hosts on the 192 network. I could even ping the address of FE0/0 from a host and get a response, but not the LAN IP of the AT&T device. So traffic wasn't coming back in once it got out.
That's when my friend Kevin suggest overloaded NAT, which worked like a charm, because Kevin is a genius.
ip nat pool all-ur-nat 192.168.8.1 192.168.8.254 netmask 255.255.255.0
ip nat inside source list 1 pool all-ur-nat overload
!
access-list 1 permit 192.168.0.0 0.0.7.255
The interesting thing to notice about the NAT configuration is that the 'NAT pool' describes addresses from the outside, the 192.168.8.0 network. Also, the mask passed to the access list is a "host mask" not a network mask. For those of you well versed in networking, this is no surprise, but I personally have never seen a host mask used before.
Another thing to note is what overload actually does. If you don't overload, the IP translation occurs at a ratio of 1:1, where one internal address equals one outside (or in this case, AT&T LAN) address. But because the AT&T router doesn't know anything about 192.168.0.0/24, either in its ARP table or in its DHCP client list or in its static routes, it doesn't know how to send traffic back into this network. If you overload the NAT translation, however, all traffic gets sent back to FE0/0, which is then properly redirected using the NAT table.
Once I got this in place, everything started working.
Wireless Bridges
Both wireless devices have had their DHCP servers turned off, putting them into bridge mode. They have been assigned static IPs of 192.168.7.128 and 192.168.7.253 as their LAN address. It's a pretty simple configuration, but it took some effort to figure out that these consumer grade routers allow you to force bridge mode by turning off the DHCP server and setting a static LAN address, even if there is no explicit 'Bridge mode' setting in the router's configuration.
Conclusion
As you can see, even a simple networking setup is difficult for folks like me that aren't well-versed in the ways of the octet. Now that we have an enterprise lab network, we can start building some enterprise solutions.